If you’re planning on a residential new build, extension, renovation, or remodel project, then it’s essential to take photos of your property to share with your residential designer, architect, or other consultants.
A picture is worth a thousand words, as they say. When you’re just getting started with the process, sending inquiries to potential service providers, and having discussions about your needs/wants, you can jumpstart the conversation by having a good set of photos. This can help your designer analyze your property and start to brainstorm solutions for the design process.
Anyone with a smartphone is capable of taking good photos of their property in less than 30 minutes. Yet, many people don’t know the best way to photograph a room or a building.
In this post, our goal is to help you overcome the uncertainty of taking bad photos, so you can capture your property in a clear, accurate, informative way.
We share our guidelines for taking optimal photos of your residential property. There are easy steps you can take (without any fancy equipment!) to prepare your home and take photos of it. This is the exact guide we recommend our potential and current clients to read, and we hope you find it useful!

Preparing to Take Photos of Your Property
First, prepare your home. Choose a time of day when the lighting is good. Move your car and/or move items out of the way so you can see the room or building clearly. Remote clutter and trash, but don’t worry about cleaning or tidying everything perfectly.
Next, make sure your smartphone battery is charged. Find the camera app and use it to take photos.
Take Photos of Your Property
Set aside 20 to 30 minutes for your mini DIY photoshoot of your property.
For renovations, remodels, or extensions on an existing building, take around 30 to 40 photos of the exterior and interior of the house. If you want, you can take up to 50 to 60 photos, depending on the size of your property. The aim is to show a comprehensive view of the current building.
For new building projects on an empty lot, you might only need 10 to 20 photos to show the landscape and the surrounding area.
You can also send real estate listing photos, but you should still plan to take photos yourself.
Photography Tips
- Use a smartphone – the latest ones have great cameras. You don’t need a fancy, expensive camera or fancy equipment.
- Take photos primarily in landscape (horizontal) orientation.
- Take high-resolution photos (most smartphones automatically do this). Don’t downsize or shrink the file size significantly when sending to your designer.
Composition Tips
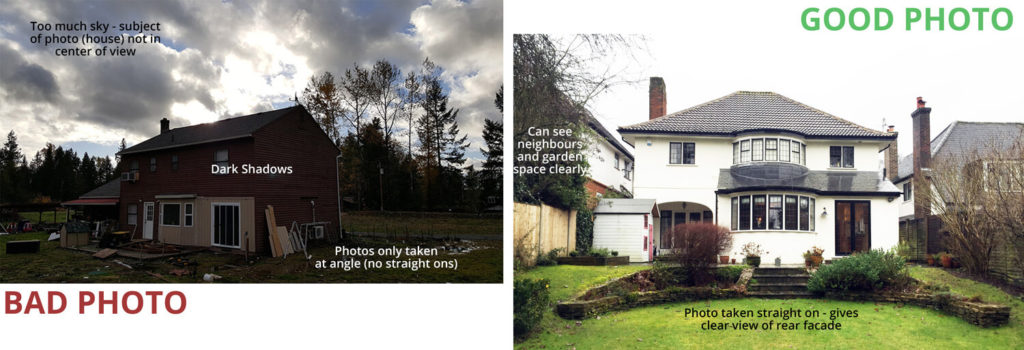
- Take photos straight on (not at weird angles). What do we mean? For interior rooms, stand at one side of the room and point your camera facing straight towards the opposite wall. For exteriors, stand at a proper distance so you can fit the entire side of the building in the photo (if possible and safe to do so!).
- Don’t stand too close to the subject of the photo (unless there is no room to back up).
- Keep the main subject of the photo in the center of the frame whenever possible.
- The best lighting is either on a cloudy day or on a clear, bright day. Avoid photographing the building in complete shadow, unless it’s a north-facing facade and there is no alternative time of day.
- Show the interior of the property in good natural daylight.

What to Photograph
Follow the instructions below for what to photograph. Make a list before you start so you remember to cover all the areas relevant to your project.
For vacant land plots:
- All areas of the property from multiple angles.
- Surrounding neighborhood, landscape.
- Nearby buildings or houses.
For the exterior of your property:
- All four elevations / all sides of the building. (Facing straight on and at an angle.)
- Porch areas, covered outdoor spaces. (Standing outside of and inside of the space.)
- Close up photos of doors, windows, steps, other details. (Anything you think is essential.)
- Streetscape and surrounding landscape is helpful. (Gives us an idea of the context.)
For the interior of your property:
- Entry space
- Kitchen
- Living room
- Dining areas
- Stairs
- Bedrooms
- Bathrooms
- Storage spaces
- Attic or basement spaces
- Garage
Determine which of the above items are relevant to your project/needs.
An additional note about interiors: You can take photos from the corner of the room, as well as straight on to each side of the room. You should also take photos of awkward areas and spaces in your home as best you can. Take multiple photos at different angles, if necessary.
Finishing Up
- Delete blurry photos from your phone/device. They aren’t helpful or necessary to keep. Don’t send us blurry photos. Retake a photo, if necessary.
- Make sure that none of the photos are too dark or too light (overexposed).
- Advanced tip: annotate photos with any measurements or notes. You can do this on most smartphones in the edit photo feature.
Sending Your Photos to Your Designer
Now it’s time to send your photos to your residential designer, architect, or other home consultant.
When working with us, there are two easy ways you can do this.
First option: you can send us multiple emails with the photos attached. Even if it’s 10-15 emails, that’s okay. We will download the photos and save all of them into one place in our project folder system.
Second option: If you use Dropbox, you can upload to your Dropbox account into a new folder. You can do this directly on your phone. Open the Dropbox app, hit the ‘+’ symbol, and create a new folder. Then, choose which photos to upload from your phone. Once all the photos are uploaded, then view the folder, tap the three dots in the upper corner. Here you can tap Copy Link or Share, and then send us the link to download the photos.
A Final Note!
Taking photos of your property or home can be fun, easy, and quick to do.
One last piece of advice is…
Don’t be embarrassed to show us any aspect of your home!
If you feel as though you want to hide some part of your property, that’s probably the exact thing you should photograph to show your designer.
It’s our job to look at the existing and figure out a creative solution to transform it.
Your photographs will help us understand and uncover the current situation. It will help us envision a complete picture of your home or space as we begin the discussion and the design process.
If you’d like to learn more about our online residential design services, check out the details here: Our Design Packages.
DAESCI Design is a revolutionary approach to Residential Design, offering custom design and planning drawings—delivered 100% online. We help families and couples design beautiful, functional homes, stop feeling overwhelmed about their residential space, & start designing the life they’ve always wanted. Learn more about working with DAESCI Design.